Key Takeaways:
How to Create a Block in AutoCAD
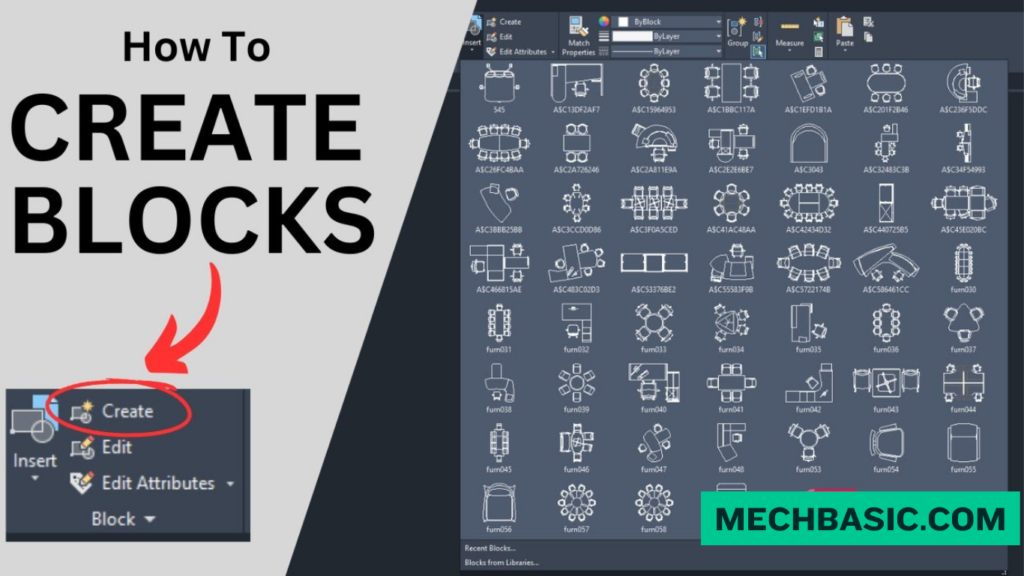
What is a Block?
A Block is a group of objects combined into a single reusable object. Blocks are useful for frequently used elements such as doors, windows, symbols, furniture, electrical symbols, and title blocks.
Steps to Create a Block
1. Draw the Objects
Create the geometry you want to convert into a block.
2. Start the Block Command
Type BLOCK or B → press Enter.
3. Name the Block
Enter a suitable name, such as DOOR_900 or BOLT.
4. Select a Base Point
Click Pick Point and select the point that will be used when inserting the block.
5. Select Objects
Click Select Objects, choose all the objects that should become part of the block, then press Enter.
6. Choose the Block Behavior
Select Retain, Convert to Block, or Delete the original objects as required.
7. Click OK
AutoCAD creates the block.
How to Insert the Block
Type INSERT → select the block → specify:
- Insertion point
- Scale
- Rotation angle
Then click to place it in the drawing.
Key Takeaway
Draw Objects → BLOCK → Name → Base Point → Select Objects → OK → INSERT
Tip: Use a logical base point—for example, use the door hinge point for a door block—so positioning the block becomes much easier.
In this article:
How to Create a Block in AutoCAD
AutoCAD Blocks are reusable groups of objects that are combined into a single named object. Blocks are extremely useful when the same drawing element needs to be used repeatedly.
For example, an architectural drawing may contain hundreds of doors, windows, furniture symbols, or electrical fixtures. Instead of drawing each object separately, you can create it once as a Block and insert it wherever needed.
Using blocks helps improve drawing consistency, productivity, file organization, and editing efficiency.
What is a Block?
An AutoCAD Block is a collection of drawing objects combined and saved under a specific name.
A block can contain:
- Lines
- Polylines
- Circles
- Arcs
- Text
- Hatches
- Dimensions
- Attributes
Once created, the objects behave as a single block reference when inserted into a drawing.
Common Block Examples
- Doors
- Windows
- Furniture
- Light fixtures
- Electrical symbols
- Vehicles
- Trees
- Mechanical components
- Structural symbols
- Plumbing fixtures
Steps to Create a Block
Creating a block in AutoCAD involves selecting the objects, defining a base point, and assigning a name.
Step 1: Create the Objects
First, draw the geometry that you want to convert into a block.
Example
To create a simple door block, you could draw:
- Door frame
- Door leaf
- Door swing arc
Step 2: Select the Objects
Select all the objects that should become part of the block.
Make sure you select every required object.
Step 3: Start the Block Command
Type:
BLOCK
in the command line and press Enter.
You can also use the Block tool from the Insert or Block-related tools in the AutoCAD interface.
The Block Definition dialog box will appear.
Step 4: Enter a Block Name
Enter a descriptive name for your block.
For example:
DOOR_SINGLE
Other examples could be:
- WINDOW_1200
- OFFICE_CHAIR
- LIGHT_FIXTURE
- TABLE_4_SEAT
- VALVE_GATE
Use meaningful names so that blocks can be easily identified later.
Step 5: Specify the Base Point
Click Pick Point and select the point that will be used as the block’s insertion point.
This is an important step.
Example
For a door, you might select the bottom corner of the door frame as the base point.
When the block is inserted later, this point controls where the block attaches to the cursor or insertion location.
Step 6: Select the Objects
Click Select Objects and select the geometry that you want to include in the block.
Press Enter after making your selection.
Step 7: Review Block Settings
Check the available options before creating the block.
Depending on your workflow, you may need to consider options such as:
- Retaining the original objects
- Converting the selected objects into the block
- Deleting the original objects
For most basic workflows, retaining the original geometry is useful if you want to continue working with it separately.
Step 8: Create the Block
Click:
OK
Your selected objects are now defined as a block.
If you selected the option to convert the original objects into a block, they will now behave as a single block reference.
How to Insert the Block
Once a block has been created, you can insert it multiple times.
Step 1: Start the Insert Command
Type:
INSERT
and press Enter.
You can also use the Insert tool from the AutoCAD interface.
Step 2: Select the Block
Choose the block you created.
For example:
DOOR_SINGLE
Step 3: Specify the Insertion Point
Click the location where you want to place the block.
The block will be inserted using the base point you defined when creating it.
Step 4: Set the Scale
You can specify the:
- X scale
- Y scale
- Z scale
For a standard block, use:
1, 1, 1
This inserts the block at its original size.
Step 5: Set the Rotation
Specify the rotation angle.
For example:
- 0° – Normal orientation
- 90° – Rotated 90 degrees
- 180° – Rotated 180 degrees
- 270° – Rotated 270 degrees
Example: Creating a Door Block
Let’s create a simple architectural door block.
Step 1
Draw a door using:
- Lines for the frame
- A line for the door panel
- An arc for the door swing
Step 2
Select all three elements.
Step 3
Type:
BLOCK
Step 4
Enter the block name:
DOOR_SINGLE
Step 5
Choose the bottom corner of the door frame as the base point.
Step 6
Select the door geometry.
Step 7
Click OK.
The door is now a reusable block.
Step 8
Use:
INSERT
to place the door in multiple locations.
You can then rotate or scale individual block references as required.
Why Use Blocks?
1. Saves Time
Create an object once and reuse it many times.
2. Improves Consistency
Every inserted block uses the same basic geometry.
3. Simplifies Editing
If you need to update the definition of a block, all references can reflect the updated definition.
4. Reduces Repetitive Drawing
You don’t need to redraw the same symbol repeatedly.
5. Improves Drawing Organization
Blocks make drawings easier to manage and standardize.
Block vs Individual Objects
| Feature | Individual Objects | Block |
|---|---|---|
| Reusable | Limited | ✅ |
| Single insertion object | ❌ | ✅ |
| Consistent geometry | Manual | ✅ |
| Easy repeated placement | ❌ | ✅ |
| Supports attributes | ❌ | ✅ |
| Suitable for symbols | Good | ⭐ Excellent |
Tips for Creating Better Blocks
Autodesk Learn: Block Creation in AutoCAD: Official video and step-by-step tutorial on converting drawn geometry into reusable block definitions, specifying base points, and setting annotative behaviors.
1. Choose a Logical Base Point
Place the insertion point where the block will naturally connect to other geometry.
2. Use Descriptive Names
Instead of:
BLOCK1
use:
DOOR_SINGLE_900
This makes the block easier to identify.
3. Keep Blocks Simple
Avoid unnecessary geometry that increases drawing complexity.
4. Use Layers Carefully
Consider how the block’s layers should behave when it is inserted into different drawings.
5. Use Attributes When Necessary
For blocks such as equipment tags, title blocks, or electrical symbols, attributes can store editable information such as:
- Part number
- Equipment ID
- Manufacturer
- Description
- Drawing number
Frequently Asked Questions (FAQs)
1. What command is used to create a block in AutoCAD?
Use the:
BLOCK
command.
2. What command is used to insert a block?
Use:
INSERT
to place a previously created block into the drawing.
3. Can I edit an AutoCAD block?
Yes. Block definitions can be modified using AutoCAD’s block-editing tools.
4. Can I use the same block multiple times?
Yes. A block can be inserted many times throughout a drawing.
5. What is the most important part of creating a block?
Choosing the correct base point is particularly important because it determines how the block is positioned when inserted.
6. Can a block contain text?
Yes. Blocks can contain text, and attribute definitions can be used when the text needs to be editable for each individual block reference.
Conclusion
Creating a block in AutoCAD is one of the most useful techniques for improving CAD productivity.
Quick Workflow
Draw Objects → Select Objects → BLOCK → Enter Name → Pick Base Point → Select Objects → OK → INSERT
Blocks are especially useful for repetitive elements such as doors, windows, furniture, electrical symbols, mechanical components, and equipment.
By creating a well-organized block library, you can save drafting time, maintain consistency, simplify drawing management, and improve overall CAD productivity.
Latest articles:

Best Budget Workstation Laptops for SolidWorks and Heavy 3D Assembly Modeling
Best Budget Workstation Laptops for SolidWorks and Heavy 3D Assembly Modeling Overview What Does SOLIDWORKS…

SolidWorks Standard vs Professional vs Premium: Full Feature Comparison
SolidWorks Standard vs Professional vs Premium: Full Feature Comparison Overview: SOLIDWORKS Package Overview SOLIDWORKS comes…

SolidWorks 2026 License Cost: Perpetual vs Subscription Pricing Breakdown
SolidWorks 2026 License Cost: Perpetual vs Subscription Pricing Breakdown Overview: SOLIDWORKS 2026 License Options SOLIDWORKS…
Flatness-GD&T | GD&T Tutorials

ANSI vs ISO Standards-Key Differences you need to know
Straightness-GD&T | GD&T Tutorials
Categories: