
The AutoCAD user interface consists of the Ribbon, Drawing Area, Command Line, and Status Bar.
These tools provide access to drawing, editing, and viewing commands.
The interface is designed to improve efficiency and ease of navigation.
In this article:
- AutoCAD User Interface
- Main Components of the AutoCAD User Interface
- 1. Application Menu
- 2. Quick Access Toolbar
- 3. Title Bar
- 4. Ribbon
- 5. Drawing Area
- 6. Command Line
- 7. Navigation Tools
- 8. UCS Icon (User Coordinate System)
- 9. ViewCube
- 10. Status Bar
- 11. Layout Tabs
- 12. Model Space vs Paper Space
- AutoCAD Coordinate Display
- Workspace Types
- Most Important Interface Areas for Beginners
- Typical Workflow Using the Interface
- Summary Table
- Conclusion
AutoCAD User Interface
Introduction
The AutoCAD User Interface (UI) is the workspace where users create, edit, and manage drawings. It contains various tools, menus, panels, and command areas that help designers work efficiently.
Understanding the AutoCAD interface is the first step in becoming proficient with the software.
Main Components of the AutoCAD User Interface
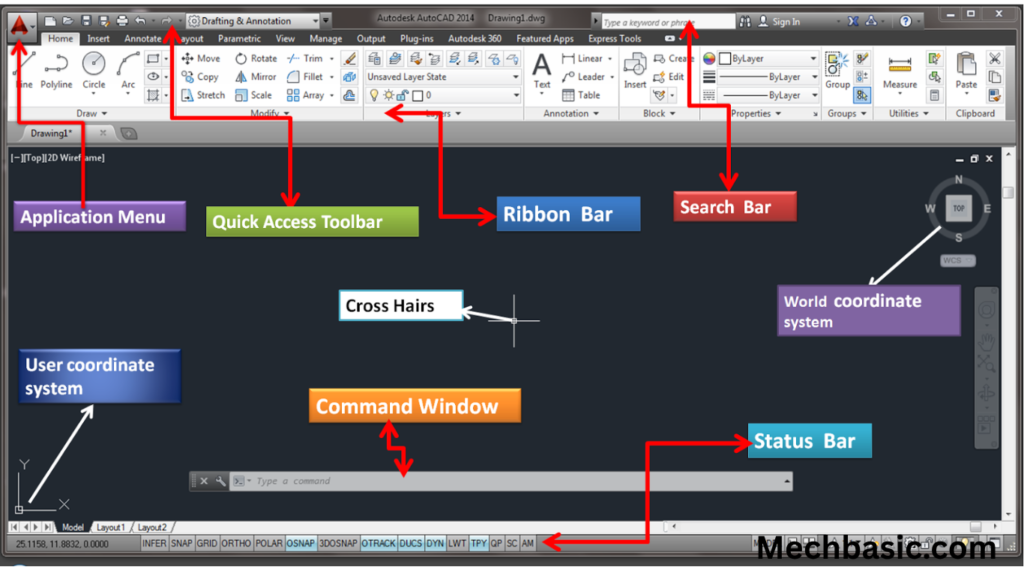
The AutoCAD interface typically consists of:
- Application Menu
- Quick Access Toolbar
- Title Bar
- Ribbon
- Drawing Area
- Command Line
- Navigation Tools
- UCS Icon
- ViewCube
- Status Bar
- Layout Tabs
- Model Space and Paper Space
1. Application Menu
Located at the top-left corner (the large AutoCAD icon).
Functions
- New Drawing
- Open Drawing
- Save
- Save As
- Export
- Close
Similar to
The File menu in Microsoft Office applications.
Example
To open an existing DWG file:
Application Menu → Open
2. Quick Access Toolbar
Located above the Ribbon.
Purpose
Provides one-click access to frequently used commands.
Common Buttons
- New
- Open
- Save
- Undo
- Redo
Benefit
Saves time by avoiding multiple menu clicks.
3. Title Bar
Located at the very top of the AutoCAD window.
Displays
- Drawing name
- Software name
- Current file status
Example
Bracket_Design.dwg - AutoCAD4. Ribbon
The Ribbon is the primary command area in AutoCAD.
It contains tabs and panels organized by task.
Major Ribbon Tabs
Home
Most frequently used tab.
Contains:
Draw Panel
- Line
- Circle
- Arc
- Rectangle
- Polygon
Modify Panel
- Move
- Copy
- Rotate
- Mirror
- Trim
- Extend
Layers Panel
- Create layers
- Layer properties
Annotation Panel
- Text
- Dimensions
- Leaders
Insert Tab
Used to insert:
- Blocks
- Images
- PDFs
- External references
Annotate Tab
Used for:
- Dimensions
- Notes
- Tables
- Text formatting
View Tab
Used for:
- Zoom
- Viewports
- Visual styles
Output Tab
Used for:
- Printing
- Plotting
- PDF export
5. Drawing Area
The largest part of the screen.
Purpose
The area where drawings are created and edited.
Activities
- Draw lines
- Create shapes
- Modify objects
- Add dimensions
Think of it as the digital drawing sheet.
6. Command Line
Located near the bottom of the screen.
Importance
One of the most powerful parts of AutoCAD.
Functions
- Enter commands
- View prompts
- Receive system messages
Example
Typing:
LINEstarts the Line command.
Typing:
CIRCLEstarts the Circle command.
Why Professionals Use It
Using the command line is often faster than clicking icons.
7. Navigation Tools
Used to move around the drawing.
Includes
Zoom
Allows closer or wider views.
Commands:
- Zoom In
- Zoom Out
- Zoom Extents
Pan
Moves the drawing without changing scale.
8. UCS Icon (User Coordinate System)
Usually located in the lower-left corner.
Purpose
Shows the current coordinate directions.
Axes
- X-axis
- Y-axis
- Z-axis (in 3D)
Importance
Essential for precise drawing and 3D modeling.
9. ViewCube
Usually located in the upper-right corner.
Purpose
Helps control viewing angles in 3D.
Views Available
- Top
- Front
- Right
- Left
- Isometric
Example
Click “Top” to see the model from above.
10. Status Bar
Located at the bottom of AutoCAD.
Contains important drafting aids.
Common Status Bar Tools
ORTHO
Restricts cursor movement to:
- Horizontal
- Vertical
Shortcut:
F8OSNAP (Object Snap)
Helps select precise points.
Examples:
- Endpoint
- Midpoint
- Center
- Intersection
Shortcut:
F3GRID
Displays a grid on the screen.
SNAP
Moves cursor in fixed increments.
POLAR Tracking
Helps draw at specified angles.
Dynamic Input
Displays command prompts near the cursor.
Shortcut:
F1211. Layout Tabs
Located at the bottom.
Tabs
Model
Used for drawing.
Layout1 and Layout2
Used for printing and plotting.
Purpose
Separate drawing creation from printing setup.
12. Model Space vs Paper Space
Model Space
Where actual drawing is created.
Features:
- Full-size drawing
- Design work
Paper Space
Used for:
- Sheet preparation
- Printing
- Plotting
Contains:
- Title blocks
- Viewports
- Notes
AutoCAD Coordinate Display
Usually found at the bottom.
Shows cursor position:
X = 100
Y = 50
Useful for precise drafting.
Workspace Types
AutoCAD offers different workspaces.
Drafting & Annotation
Best for:
- 2D drawings
3D Modeling
Best for:
- Solid models
- Surface models
Most Important Interface Areas for Beginners
Focus on mastering:
- Ribbon
- Drawing Area
- Command Line
- Status Bar
- Layers Panel
These are used in almost every drawing session.
Typical Workflow Using the Interface
Step 1
Create a new drawing from the Application Menu.
Step 2
Use Ribbon or Command Line to draw geometry.
Step 3
Modify objects using the Modify Panel.
Step 4
Add dimensions from the Annotate Tab.
Step 5
Manage layers.
Step 6
Plot the drawing using the Output Tab.
Summary Table
| Interface Element | Purpose |
|---|---|
| Application Menu | File operations |
| Quick Access Toolbar | Frequently used commands |
| Ribbon | Main tool area |
| Drawing Area | Create drawings |
| Command Line | Enter commands |
| Status Bar | Drafting aids |
| UCS Icon | Coordinate orientation |
| ViewCube | 3D navigation |
| Layout Tabs | Printing layouts |
| Model Space | Drawing creation |
| Paper Space | Plotting and printing |
Conclusion
The AutoCAD User Interface is designed to provide quick access to drawing, editing, annotation, and plotting tools. The most important components are the Ribbon, Drawing Area, Command Line, Status Bar, and Layout Tabs. Once you understand how these elements work together, you can create accurate technical drawings much faster and use AutoCAD efficiently for mechanical, civil, architectural, and manufacturing applications.
Other courses:


