
Replacing brake pads is a fundamental part of vehicle maintenance that ensures safe and effective braking. Worn brake pads can lead to reduced stopping power, squealing noises, and even damage to the brake rotors if not addressed. Knowing the proper steps to remove old pads and install new ones helps maintain optimal braking performance and prolongs the life of your braking system.
In this article:
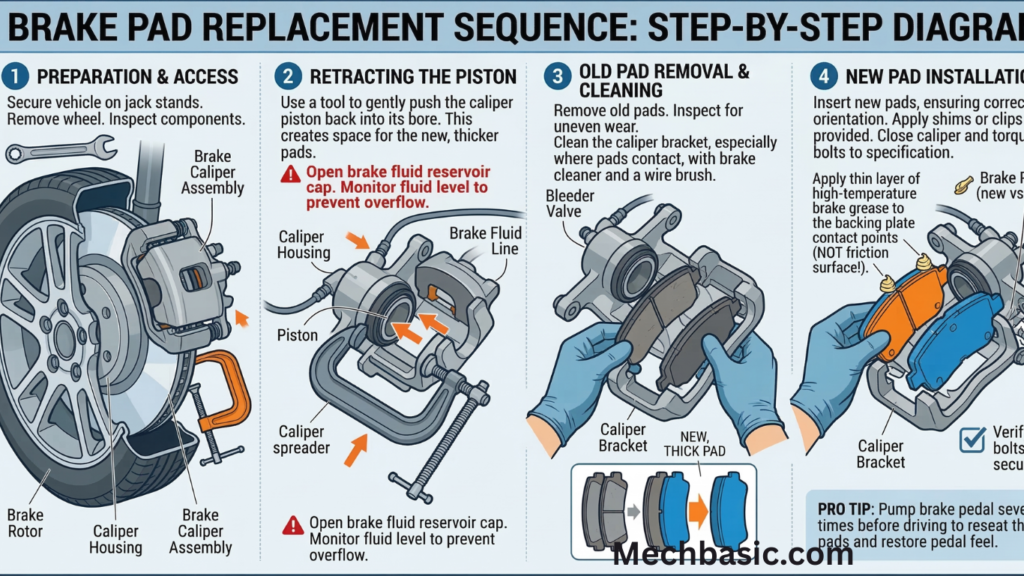
How to replace brake pads?
Replacing brake pads is a common maintenance task that can improve braking performance and save money compared to professional service. Here’s a detailed, step-by-step guide, covering preparation, removal, installation, and safety tips.
1. Tools & Supplies Needed
- New brake pads (front or rear)
- Brake fluid (optional, for topping up)
- Jack and jack stands
- Wheel chocks
- Lug wrench
- Socket set and wrenches
- C-clamp or brake caliper tool (to compress caliper piston)
- Screwdriver or pry bar
- Gloves and safety glasses
- Rags or shop towels
- Anti-seize lubricant (optional, for pad backing or caliper pins)
2. Safety Precautions
- Work on a level surface
- Engage parking brake
- Use wheel chocks on opposite wheels
- Wear gloves and eye protection
- Ensure vehicle is securely supported on jack stands; never rely on a jack alone
3. Preparation
- Loosen lug nuts on the wheel(s) you’ll be working on (do not remove yet)
- Jack up the vehicle and place jack stands for safety
- Remove the wheel
4. Remove Old Brake Pads
Step 1: Locate the Caliper
- Brake caliper houses the pads and is bolted over the rotor
- Some calipers have sliding pins or bolts
Step 2: Remove Caliper Bolts
- Remove bolts or pins securing the caliper to the bracket
- Do not disconnect brake line; just move caliper out of the way
Step 3: Remove Old Pads
- Slide out the old brake pads from the caliper bracket
- Inspect rotor for wear or damage
Step 4: Compress Caliper Piston
- Use a C-clamp or caliper tool to push the piston back into the caliper housing
- Place old brake pad over piston to distribute pressure evenly
- Ensures new pads fit correctly
5. Install New Brake Pads
- Apply anti-seize or brake grease to pad backing and caliper contact points
- Slide new pads into caliper bracket in the same orientation as old pads
- Make sure pads are fully seated and aligned
6. Reattach the Caliper
- Carefully position caliper over new pads
- Reinsert caliper bolts or pins and torque to manufacturer specifications
7. Reinstall Wheel and Lower Vehicle
- Place wheel back on hub
- Hand-tighten lug nuts
- Lower vehicle from jack stands
- Torque lug nuts to manufacturer specifications
8. Check Brake System
- Pump brake pedal several times until firm
- This seats the new pads and moves caliper piston
- Check brake fluid level in reservoir and top up if needed
- Inspect for leaks or abnormal noises
9. Test Drive
- Drive at low speed and brake gently
- Listen for squeaks, grinding, or vibration
- Ensure brakes feel responsive
10. Tips for Longevity
- Bed in new pads by gentle braking for first 200–300 km (~120–180 mi)
- Avoid sudden hard stops immediately after installation
- Check caliper pins and lubrication during future maintenance
11. Common Mistakes to Avoid
| Mistake | Problem |
|---|---|
| Not compressing piston fully | Pads won’t fit, caliper binding |
| Forgetting to pump brake pedal | Soft pedal, incomplete piston seating |
| Reusing old pads | Poor braking, uneven wear |
| Not torquing bolts correctly | Caliper can loosen or seize |
| Contaminating pad friction surface | Reduced braking performance |
Summary:
| Step | Action |
|---|---|
| 1 | Loosen wheel lug nuts |
| 2 | Jack up car and secure on stands |
| 3 | Remove wheel |
| 4 | Remove caliper bolts |
| 5 | Slide out old pads |
| 6 | Compress caliper piston |
| 7 | Install new pads |
| 8 | Reattach caliper |
| 9 | Reinstall wheel and torque lug nuts |
| 10 | Pump brake pedal and check fluid |
| 11 | Test drive carefully |
💡Always replace brake pads in pairs (front or rear) to maintain even braking and safety.
Other courses:


