
A step-by-step drilling guide outlines the correct procedure for creating accurate and safe holes in a workpiece. It covers preparation, tool selection, machine setup, drilling, and inspection to ensure efficiency and precision.
In this article:
- How to Drill – Step-by-Step Procedure
- Step 1: Study the Drawing / Job Requirement
- Step 2: Marking and Layout
- Step 3: Center Punching
- Step 4: Clamping the Workpiece
- Step 5: Select and Mount the Drill Bit
- Step 6: Set Spindle Speed and Feed
- Step 7: Center Drilling (Spot Drilling)
- Step 8: Drilling the Hole
- Step 9: Finishing Operations (If Required)
- Step 10: Retract Tool and Stop Machine
- Step 11: Deburring and Cleaning
- Step 12: Inspection
- Summary Table
How to Drill – Step-by-Step Procedure
Drilling is a basic but very important machining operation. Following the correct step-by-step procedure ensures accuracy, safety, and good surface finish.
The steps below apply to manual drilling machines and CNC (conceptually).
Step 1: Study the Drawing / Job Requirement
- Check:
- Hole diameter
- Hole depth (through or blind)
- Tolerance
- Surface finish requirement
- Select the correct drill size and tool material.
Purpose: Avoid mistakes and rework.
Step 2: Marking and Layout
- Clean the workpiece.
- Apply layout dye (if required).
- Mark the hole location using:
- Steel rule
- Vernier height gauge
- Divider
Purpose: Accurate hole position.
Step 3: Center Punching
- Use a center punch and hammer.
- Make a small indentation at the marked point.
Purpose: Prevents drill bit from slipping or wandering.
Step 4: Clamping the Workpiece
- Secure the workpiece using:
- Machine vice
- T-slot clamps
- Fixture
- Ensure the surface is perpendicular to the drill.
Purpose: Safety and dimensional accuracy.
⚠️ Never hold the workpiece by hand.
Step 5: Select and Mount the Drill Bit
- Choose the correct drill:
- Twist drill (general)
- Center drill (starting)
- Mount the drill in:
- Drill chuck
- Morse taper spindle
Purpose: Proper tool engagement and accuracy.
Step 6: Set Spindle Speed and Feed
- Speed depends on:
- Work material
- Drill diameter
- Tool material
- Set proper feed rate.
Purpose: Prevent overheating and tool damage.
Step 7: Center Drilling (Spot Drilling)
- Use a center drill to create a pilot point.
Purpose:
- Accurate hole start
- Reduced drill deflection
Step 8: Drilling the Hole
- Start the machine.
- Apply steady feed.
- Use peck drilling for deep holes:
- Drill → retract → drill again
- Apply coolant if required.
Purpose: Proper hole formation and chip removal.
Step 9: Finishing Operations (If Required)
Depending on the job:
- Reaming → Improve accuracy and surface finish
- Counterboring → Flat-bottom recess
- Countersinking → Conical recess
- Tapping → Internal threads
Step 10: Retract Tool and Stop Machine
- Slowly withdraw the drill.
- Stop the machine after drill clears the hole.
Purpose: Prevent tool breakage and surface damage.
Step 11: Deburring and Cleaning
- Remove sharp edges using:
- Deburring tool
- File
- Clean chips and coolant.
Step 12: Inspection
- Measure hole using:
- Vernier caliper
- Plug gauge
- Depth gauge
- Check diameter, depth, and position.
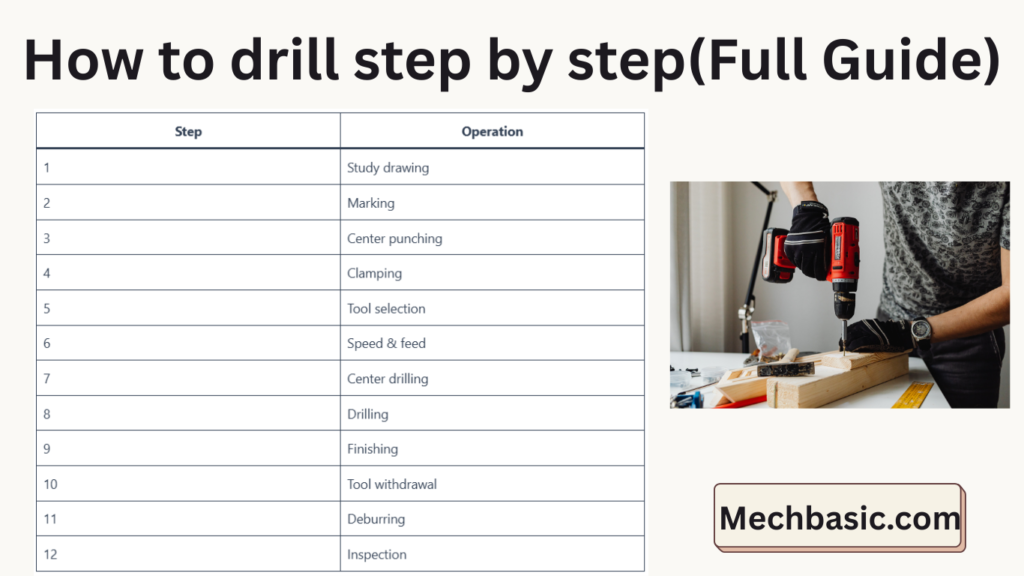
Summary Table
| Step | Operation |
|---|---|
| 1 | Study drawing |
| 2 | Marking |
| 3 | Center punching |
| 4 | Clamping |
| 5 | Tool selection |
| 6 | Speed & feed |
| 7 | Center drilling |
| 8 | Drilling |
| 9 | Finishing |
| 10 | Tool withdrawal |
| 11 | Deburring |
| 12 | Inspection |
Conclusion:
Drilling is done by marking, punching, clamping, drilling, finishing, and inspecting to get an accurate hole safely.
Other courses:


